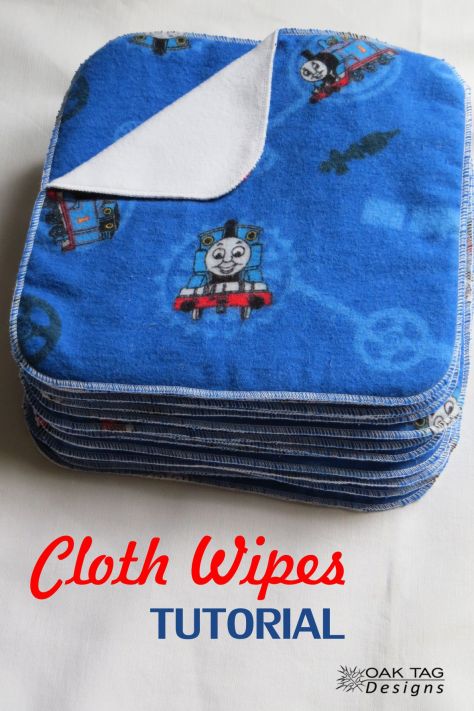
Who loves using cloth nappies, only to have to have a separate bin for the delicious disposable wipes, flapping around in there? Mmm, yum! (Not me, btw..) Which is why I started using flannel face washers, and then started experimenting with sewing my own. I perfected one I loved and then, started selling them. They did well, but.. another bub came along, and changed my time constraints. Having made many since, for friends and friends of friends, I thought I would share a quick tutorial on how to make them.
The wipes can also be used in the kitchen or bathroom, as face or body washers. The kids love them because they can have a cute pattern or favourite character, as well as being soft on their skin.
Firstly you need to suss out the following materials:
- Some very cool flannelette fabric.
- Some very soft and lovely matching microfleece.
The flannelette is great at holding the water and washing off the urine, while the microfleece doesnt hold so much water but has the length to grab up any poos. The microfleece is also supersoft if your bub has had a rash. Using just water on them means there is nothing to cause irritation on the bubs bottom, like many disposable wipes can.
The wipes, using these fabrics, can be washed in with your normal cloth nappies. I have hotwashed them many many times and they stand up to the test.
Next you need to decide how many wipes you would like. I have given packs of 20 to many people, as that seems to be just enough if you are washing every day or second day. I made 50 and found the last 10 never made it out of the cupboard, so between 20 and 40 would be the magic number. If you have never used cloth wipes, it may not seem many, but rest assured you use less than disposable wipes.
At 20cm x 20cm for each wipe, I will help you out with the math.
- Microfleece usually comes in 150cm width, so at 7 wipes wide, a 1m length will give you 35 wipes.
- To match the 35 wipes in flannelette fabric, you will need a 140cm length of 110cm wide fabric, or a 180cm length of 90cm wide fabric.
Once you have your fabric, I suggest you prewash, then iron the flannelette (overlock the raw edges first). This is because flannelette has a higher rate of shrinking. This is not completely necessary because it is not a garment you are going to wear. (Garments can shrink below your size). Even though I always preshrink the flannelette, it is admittedly easier to cut straight off the roll.
Next you need to cut your fabric out into 20cm x20cm squares. There are different methods, but two in particular I found easier. The first way is using a big square ruler, marking 20cm squares with tailors chalk (the rotating wheel tailors chalk is fabulous), then cutting with scissors. The second way is by using a quilters mat, ruler, and quilting rotary cutter. It is easier to cut your flannelette squares out first, then place them all on your microfleece and cut them out there. It means if you go a bit wonky with the flanny ones, your microfleece is the perfect matching wonky!
Next you just need to overlock the edges. Place your two pieces, wrong sides together, and overlock the whole way around. To keep the corners nice, hold it firmly (no twisting) and turn it slowly starting about an inch from the edge to make a curved overlocked edge.
Trim your ends, wash and dry and use!
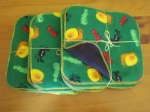
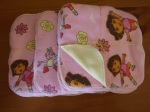
Here is some other ones that I have made. Playing around with the colours of the fabric and thread can be quite fun 🙂